|
|
|
|
1868 Liberty Seated Proof Quarter Dollars
by Greg Johnson
Proof liberty seated quarters were minted in substantial
quantity at the Philadelphia mint each year from 1858 to 1891. There are a few,
quite rare, earlier proofs and a handful of branch mint proofs which are excessively
rare, but the vast majority of seated quarter proofs are Philadelphia mint issues
from 1858 to 1891. There were 35 distinct proof issues during that time period,
if one counts the 1873 with arrows and no arrows as two different issues. A
comparison between proof and business strike Philadelphia mint quarters reveals
an interesting pattern which is paralleled in other seated denominations. There
are frequently more proofs available to collectors than business strike coins
from the same year. This is most notable in the very low mintage years of 1864
-1870 and 1879-1890 in which production of coins for circulation never reached
the 100,000 piece level (one year as low as 5,000) and proofs were made at a
rate of from 470 to 1355 pieces.
This presents an interesting questions for the seated quarter variety collector
– namely to include the proofs or not. The business strike quarters for
these years were struck from one, or for a few issues two, die pairs in each
year. The proofs, with one exception, featured a single die pair each year.
So as a collector of these Philadelphia quarters the recurring question becomes,
“Is this the proof die pair, or the business strike die pair?” The
answer is not always simple to determine, particularly for mint state business
strikes, which frequently are found proof-like. The question can also carry
significant financial implications for collectors, as the business strikes are
often far, far rarer than the proofs and priced accordingly. Ask anyone who
has mistakenly purchased a proof 1873 no arrows closed 3 at the price of a business
strike.
Distinguishing proof from business strike is also made more difficult by the
fact that proof dies were sometimes used to make business strike coins. This
has been documented in the case of both 1852 and 1883 quarters. The 1852/52
obverse die was used to strike the 1 or 2 known proof examples, as well as a
number of business strike coins. The 1883 used distinct obverse dies for proof
and business strike issues, but the same reverse die was used for both. Now
we get to the point of this story. Yes, there is one.
I purchased an 1868 quarter in an NGC AU55 holder during the summer of 2006.
I set out to attribute the coin shortly after acquiring it, because that’s
what I do. Though it was in a holder saying it was business strike, the obverse
was clearly from the proof die. The coin, despite some fairly heavy toning and
slight wear on the high points, has wire rims and mirror surfaces under the
toning. I concluded it was a circulated and misattributed proof, but showed
it around to a few knowledgeable people at one of the Baltimore shows. The opinions
were unanimous that the coin was “probably a proof.”
Last November I had the privilege of spending some time at the LSCC table at
the Baltimore Coin and Currency Convention along with the owner of the Greenwich
Collection of proof seated quarters and many of the coins from his collection.
The collection features not just one, but two high-grade proof 1868 quarters.
In addition, another collector had a mint state business strike at the table
and I had my example, as well. A careful examination of the four coins revealed
that my example was in fact a previously undocumented mule; a combination of
the proof obverse with the business strike reverse. The attribution points for
the four dies are: Briggs Obverse 1 (Business Strike Obverse): date position
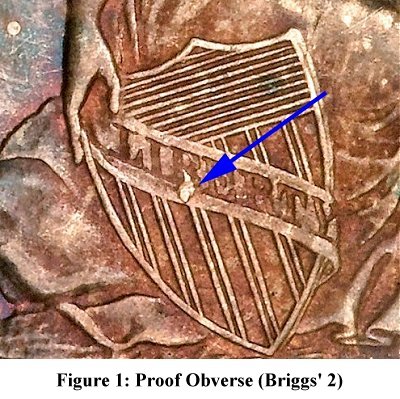
8/9 date sloping down from left to right; Briggs Obverse 2 (Proof Obverse):
date position 7 with date sloping up from left to right, 1 repunched north,
last 8 recut inside top loop, large die lump attached to B in LIBERTY; Briggs
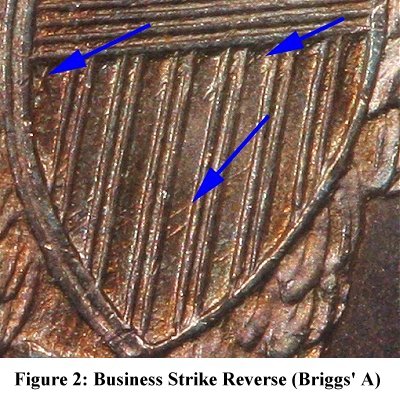
Reverse A (Business Strike Reverse): recutting on Q and OL of denomination,
distinctive pattern of die scratches between vertical shield lines; and Briggs
Reverse B (Proof Reverse): vertical lines 2 and 7 extend to horizontal line
2. Briggs Obverse 2 (Proof) is shown in Figure 1. Note the large die lump near
the B in LIBERTY. A close up of the shield from Briggs Reverse A (Business Strike)
is shown in Figure 2. Note the obvious die scratches within the vertical shield
lines.